
Leaderboard


.thumb.jpg.95d348aa76923344a5cab534cc1b3bc1.jpg)
Popular Content
Showing content with the highest reputation on 03/17/2025 in all areas
-

Spectraply compound cut BirdHouse
NC Scroller and 6 others reacted to Roberta Moreton for a topic
I couldn’t help myself. I had to try!


 7 points
 -
On The Bench - Scroll Saw Challenge
Xcrewchief and 4 others reacted to Roberta Moreton for a topic
Finished this butterfly one


 5 points
 -

On The Bench - Scroll Saw Challenge
joel brinker and 3 others reacted to scrollerpete for a topic
One. Project finished and another one on the scrollsaw

 4 points
 -
I have seen this done on here before so I decided to give it a try. I am celebrating my daughter's birthday tomorrow and I needed a box to put her jewelry in. It really was a fun project to do. It is a Carole Rothman pattern. I used walnut for the box and Holly, Purple heart, Canary wood and Bloodwood for the ribbon.

 3 points
 -

Stylized Owls
wombatie and 2 others reacted to Denny Knappen for a topic
Stylized Owls pattern by Sue Mey. I reduced the pattern to fit the wood. I used 1/2" Red Oak 4" x 12", so each is about 4" square. Cut on the Pegas Scroll Saw using Pegas #3 MGT Blades. After a light sanding with a Mac Mop, dipped in diluted Shellac, another light sanding, and one coat spray Lacquer Clear Satin. Comments welcome.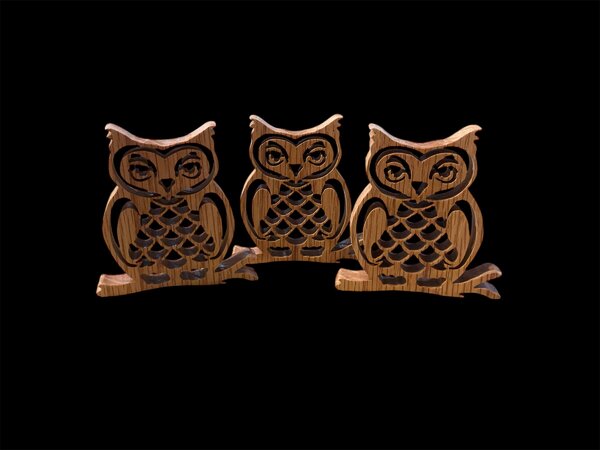 3 points
 -

A Little Something for the Bottom Feeder
MarieC and one other reacted to Bill WIlson for a topic
An awl works great for me.2 points -

Celtic Clover, St. Patrick's Day Scroll Saw Project Video
Fish and one other reacted to artisanpirate for a topic
Hey Everyone! In this fun scroll saw project video, we make a beautiful Celtic Clover for St. Patrick's Day 2025. This beautiful design is cut from oak, and the pattern is from Scroll Saw Woodworking & Crafts Magazine Spring 2022 Issue #82 by Fox Chapel Publishing. I hope you all have a happy and safe St. Patrick's Day and I hope you all like the video! #ArtisanPirate2 points -

A Little Something for the Bottom Feeder
joel brinker and one other reacted to Millwab for a topic
Instead of a nail set, before I start cutting I’ll use an awl to enlarge the exit hole from the drill bit. It cleans up any tear out there might be and gives me a better target to thread the blade through.2 points -
Pictures of the dragon cup wrap:

 2 points
 -

Stick figures person and dogs
Charlie E reacted to Allen levine for a topic
For my daughters next fundraiser at school I'm making a load of these stick figure pieces ive made 100's of them in the past mostly with the bandsaw still need sanding and some need floppy ears to be attached last years fundraiser was a huge success with the birdhouses and feeders she sold every unit I hope she sells a lot of them to staff as I told her I can make as many as she needs for the actual sale normally I trace them onto wood but this time I glued paper pattern so everyone of them is same to mix and match species Spanish cedar walnut poplar so far will use sapele and cherry as I move along she said 36 sets would be fine as I'm making her some other things like planters also since it's first week of may sale msde 18 sets so far ina couple of days but I know sanding will take some time snd my scraps are building rapidly i I did not rummage through scraps for these just lazy but all scrolling projects in future will first be sought after from scraps first if possible
 1 point
 -
.thumb.jpg.95d348aa76923344a5cab534cc1b3bc1.jpg)
Lighthouses, apples and bird houses.
wombatie reacted to barb.j.enders for a topic
Here are two lighthouses. Cut from cedar with a #5 ultra reverse blade. Thanks to @don in brooklin onfor help on the patterns. Apples also cut from the cedar. Birdhouses were cut from unknown wood, but probably spruce. It was a piece of post/rail material. Finish is one coat of Garnet Shellac.

 1 point
 -
Well I finished the birdhouses yesterday. Not sure if i.m going to put string on them to hang up or just leave them the way they are.
 1 point
 -
I just wanted to share something that has helped me over the years. Being a bottom feeder, this works very well. Several years ago, I somehow acquired a spring-loaded nail set/punch. I have been using it for years to counter dent the holes on the bottom of a piece I am working on, so it is easier to find the hole and feed the blade into it. It actually works so well that often, I do not need to raise the piece high enough to see the hole. I can do it by feel. I have worn the punch out, so today I ordered a couple more. Here is a picture of the nail set and the nice indent it makes when used on a hole.
 1 point
 -
Spectraply Compound Birds for the Miniature Birdhouse Ornaments
NC Scroller reacted to Denny Knappen for a topic
I received the pen blanks from Cousineau yesterday and had to cut some little birds. I cut a 4 little birds from the Spectraply. I received different color 20 pieces 3/4” x 3/4” x 5”, enough to make 4 birds from each piece. This makes the cost 25 cents per bird. Oh, what fun. 1 point
 -
I also use this metal scriber.
 1 point
 -
That is set and forget unless it somehow gets out of adjustment. You align the upper arm parallel to the table. I assume that is the same for all of these saw styles. I have an EX-21 and a Pegas, and it is the same for both of these.1 point
-

Spectraply compound cut BirdHouse
Roberta Moreton reacted to BadBob for a topic
I wonder what these would look like in brighter colors.1 point -
VERY nice..... I should have stayed with the hobby a little longer..1 point
-
I use a needle awl ( 1/16" shaft, from an xacto knife set ), a bead reamer, or a bead reamer Dremel bit depending on the project and how many holes there are. I'm using the needle awl on the current project, 1/16" basswood with #71 holes ( .026" ).1 point
-
Thank you Charlie, so I decided to do the ribbon cutting because I am trying to figure out a way to do something similar with the Celtic Heart you sent me....but I cannot yet figure out how to do that. I have a couple ideas...I need to hurry up since their anniversary is coming up. Thanks again.1 point
-
Absolutely beautiful!!!1 point
-
Have you bought any from Cherokee? I bought some 24 x 24 in pieces both 1/8 and 1/4 and it seems to be good. I have used it all to make tissue box covers and I've had good luck. My only problem is my table saw can't seem to cut anything perfectly square. I fight that a lot. Not like my old Unisaw for sure. That thing was dead on.1 point
-

A box with a bow.
barb.j.enders reacted to MarieC for a topic
Mark, thanks so much! It really wasn't very difficult. I made a jig to hold my piece together during the compound cuts. That also helped me to not cut myself. I think the hardest part was cutting the pieces of wood really thin using my band saw before gluing them together. I have a Laguna 18" 5 HP monster bandsaw so resawing those little itty bitty pieces on that seemed a bit scary. I ended up gluing bigger pieces of scrap wood to them to hold them while I cut them into thin strips. Hot glue works great for that as I can heat it up with a heat gun and they come apart easily with out breaking the thin pieces if that makes sense. The blade I used was a #9 I think Pegas Reverse tooth?....I used my Hawk G4 26 which allows me to tighten the blade crazy tight to reduce drift, plus I practiced all my "stop drift" techniques I learned from all of the folks on here . Cutting the ribbon didn't take too long really. I did go through probably 8 blades though because of that darn purple heart. I am not really sure how long the entire ribbon took me though because I had a bunch of interruptions. Thanks again. mc1 point -
On The Bench - Scroll Saw Challenge
MarieC reacted to Roberta Moreton for a topic
The state of my crazy…I am like that dog that sees a squirrel! I have a few things that I started and not finished. I am going to try to get these things finished before I begin again. I DO lead a monthly Scroll Saw Club. I already have a challenge peace for the month completed, it’s jewelry. So, let’s see if I can get some of these finished before the next club meeting. I also completed a candle holder for my general woodworking club challenge. OH! There is also that whirligig I started….
1 point -
RJ, Here is one I did last year. I still need to work on the contrast between the segments, glued back together with polyurethane glue. I'm thinking of glow in the dark paint for the moon.
 1 point
 -
I purchased pattern from her and never had a problem with her patterns she is the best!1 point
-

On The Bench - Scroll Saw Challenge
Xcrewchief reacted to yamatetsu for a topic
Nice legs. 1 point
 -
The third project, a test to see how far I can push myself and the material. This will be a decorative coffee cup wrap. 1/8" basswood cut with 2/0 FD Polar blades, speed reduced to 800 for control. The tail is 14 1/2" long and should wrap around the cup 2 times. This is a decorative piece and is intended to be for a cool display only, far to fragile to actually use.

 1 point
 -
Second project, a smallish plaque with a coyote howling at the moon. Forget to add info on the first project, I switched back to the long stroke on the Hegner, I just couldn't get it to cut the 7/16 plywood on the short stroke. For this project the plaque was 1/8" plywood so I switched back to the short stroke. I used 2/0 FD Polar blades and reduced the speed to 1000, my usual speed is 1400. This one's going on the back burner as well, I need temps in the 60's to be able to stain outside and let most of the solvent evaporate before bringing it back in to allow the stain to cure fully.

 1 point
 -

Kudos to Sue Mey Scroll Saw Artist
NC Scroller reacted to Mike Crosa for a topic
Sorry for the delay in responding. I had asked Sue for a modification of one of her Easter patterns. I was willing to pay for it but she did it for nothing. I thought that was very nice and above and beyond.1 point -
Black walnut bowl. Carol Rothman pattern, same book as ScrollerPete’s project. Bowl pattern is 8”x8”x3/4”. What I like about this, is there is no scrap at all, just the sawdust from the kurf of the blade, which happens to be a Pegas MGT#9. Oh and I suppose the scrap on the perimeter of the bowl. Lots of shaping/forming, (read sanding). A lot of fun to make. I plan on finishing it with shellac using the the French polish method. However, I don’t have the guts to attempt what ScrollerPete is doing. One of these days Pete, one of these days.
 1 point
 -
Hummingbird Finding Nectar intarsia pattern by Frank. All pieces cut, now ready to start sanding/shaping. Woods used include Yellowheart, Mexican Persimmon, Cherry, Walnut, and mystery wood.
 1 point
 -

On The Bench - Scroll Saw Challenge
Xcrewchief reacted to RabidAlien for a topic
Sunday's progress.

 1 point
 -

Miniature Compound Cut Lampposts, Scroll Saw Project Video
artisanpirate reacted to alexfox for a topic
Came out great!1 point -
Just to clarify: This is segmentation, so those 108 pieces have to be cut out, sanded and glued individually.

 1 point
 -
Fishnet. 36,5 x 45,2 cm, these are the first 6 pieces. Of 108. As usual, cut with a handheld fretsaw, as usual, the board is too big, but this time it's also too big for my cutting table. Fun times ahead
1 point
-
On The Bench - Scroll Saw Challenge
MarieC reacted to RabidAlien for a topic
Been some rough days around the household and the office for a while, so I haven't done as much sawdusting as I'd like. Had John 3:16 on the saw for a while now, so this weekend, to get the motivation back (as well as needing some more bookmarks....never can have enough bookmarks!!) I grabbed a couple of quick cuts from the Pattern Library (maybe one or two from Google), resized for the bookmark blanks that I have, and knocked a couple out. Still have several more to cut today, but this is what's in-progress. I've been using one of the blanks with a really intricate wolf head cut in it, and

 1 point
 -
Just finished preparing the wood for all my Mini birdhouses. Also I just got some special pen blanks that Denny turned me on to for all the little birds. Can't wait to try them out.
 1 point
 -

On The Bench - Scroll Saw Challenge
Allen levine reacted to Scrappile for a topic
Yes, sir, it's beautiful early spring weather. But as always, we get this nice weather early, things start budding out, and then the freeze comes. Never fails. Anyway, it has really put me in a Spring mood. So I saw this H. Botas pattern. It was so springy that I had to cut it. I'm about 2/3rds done. Maybe can finish cutting it today. I should be outside doing Spring clean up. 1 point
 -
On The Bench - Scroll Saw Challenge
PawPaw Vern reacted to scrollerpete for a topic
Got a few things on the go, Ying Yang box from Sheila Landry and also planing on making the “Dizzy” bowl from Carole Rothman


 1 point
 -
On The Bench - Scroll Saw Challenge
bradynjonesjr reacted to barb.j.enders for a topic
Got these done on Thursday. Pattern help from @don in brooklin on and @Fab4. Cut from leftover Cedar rail material. Finish is Walrus Oil. 1 point
 -

On The Bench - Scroll Saw Challenge
PawPaw Vern reacted to Wichman for a topic
Finished cutting, now on to painting and staining. I'll put this on the back burner untill the weather warms up a bit more.
 1 point
 -
Just seen this on YouTube and thought maybe some of you might like to see this for some ideas.1 point
-
Cool! How do they look when perched on on birdhouses?1 point
-
I think I’ll give that recipe a whirl. Finishing products cost a small fortune here in New Zealand. I converted nzd to usd and a gallon of Tung oil is on average about $95 usd. Danish oil $137 usd. So anything to lower the cost but not the finish always interests me1 point
-
I use shellac more than most finishes because it cures fast. I can thin it, dip things in it, spray it, or brush it on. It has a very short shelf life. I love to use polyurethane, but the cure time is way too long for my projects.1 point
-
Outrageous! The times we live in.1 point
-
I agree with JT. I make my wheels out of 3/8” Baltic Birch or any scrap wood that I have laying around.1 point
-

Wooden wheels
danny reacted to JTTHECLOCKMAN for a topic
Carbide is your best bet. Always carbide for longer lasting drilling in anything. Lennox is a good brand.1 point -
For me, hole saws do not stay sharp very long. If I am just making toys for little kids. I buy the wheels. If I am trying to make a model of a car, I turn the wheels on my Lathe. It is time-consuming but very rewarding.1 point


