
Leaderboard


Popular Content
Showing content with the highest reputation on 03/29/2025 in Posts
-
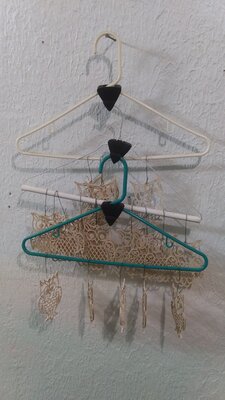
Just sharing a new (that I know of) idea for dealing with lots of ornaments. Plastic coat hangers, with notches cut into the top of the hanger rail. For storage I cut notches ( SS #2 Olsen spiral, if I had them I use a #5 ) every 1/2", for dipping I'll only go 5 ornaments per hanger. For storage I have the hooks of the wire ornament hangers in line with each other, for dipping I have them at right angles. I can get 25 ornaments per hanger for storage. I picked up some "miracle" hanger thingies. With the first package of 18 thingies I can store 525 ornaments easily. Tomorrow I'm going to pick up an inexpensive garment bag and see if I can transport the ornaments across town with it, hopefully without any damage.


 6 points
 -
Only drawback is, in Alabama, its legally probable cause to search my truck.

 4 points
 -

A new way to handle ornaments
barb.j.enders and 2 others reacted to jerry walters for a topic
Wichita, I have used the hanger for drying fretwork cuttings but had an issue with different sizes sliding into each other. Never thought of cutting a notch into the hanger. Simple but brilliant idea. Thanks. Like most of us storage of clamps has always been an issue. Many ideas on the web how to store them. I didn't want to take the time to make one. Thought it was just a bit waste of time. One day while shopping at Walmart I saw an old-fashioned current rod. For less than a dollar I picked on up that extends to 4 feet. Perfect for hanging clamps of all kinds, except the heavy ones. Maybe other villagers can post simple but useful solutions here. Jerry3 points -

New Gnome
red river and one other reacted to don in brooklin on for a topic
For all you Gnome-holics out there. This is a little different in that it has arms compound cut. I modified one of Diana Thompsons patterns of a Dragon. Also, the person who requested this wanted 2 signs so the sign is held on by earth magnets and can be changed easily. PS: Please no political comments as I have enough of those on Facebook to sink a ship.
 2 points
 -

Stick figures person and dogs
Gonzo and one other reacted to Allen levine for a topic
So I've made hundreds of stick figures both on bandsaw and hegner many are related to certain people and their profession or hobby ive made teachers with students foot doctor a gazillioon people with all breeds of dogs cats birds etc not wanting to get started on a new project I wasted some time making a stick figure of me and my hegnet laugh because it's pretty funny i even mounted casters on the bottom of the stool(black push pin with stem cut down)
 2 points
 -

Willie nice receiver hitch cover
barb.j.enders and one other reacted to Wichman for a topic
That's Willie nice2 points -
.thumb.jpg.95d348aa76923344a5cab534cc1b3bc1.jpg)
New Gnome
heppnerguy and one other reacted to barb.j.enders for a topic
Looks great @don in brooklin on. This was my take on Elbows Up. I did take two and turn them into earrings that I wear when I go out. 2 points
 -
I have been curious about hardwax finishes for a couple of years but could not bring myself to pay the high cost to try them out. In this video, Nick Engler explains what they are, how to apply them, and compares them. At the end, he also provides a recipe for two different hard wax finishes you can make yourself.1 point
-
HA, that's cool!1 point
-
That's a interesting idea... look forward to hearing how the transport goes.1 point
-

Installing pinless blades is a major PIA. Help
OCtoolguy reacted to Bill WIlson for a topic
Pinned blades are typically much larger than pinless blades, so thus much more robust. If you are used to heavy, aggressive cutting with pinned blades, pinless blades won't stand up to the same use.1 point -

Ring Box?
kmmcrafts reacted to JTTHECLOCKMAN for a topic
I would do away with the wood pins and use some brass screws. Tap the wood and then glue screw in. If you are worried about screws wearing into wood, then add some brass tubing as sleeves.1 point -
Installing pinless blades is a major PIA. Help
OCtoolguy reacted to JTTHECLOCKMAN for a topic
What type holders do you have? Are they the barrel type or the square block type. Either one you install the blade into the holders with the holders out of the saw. Could not be any easier. The top blade holders you see very easily too. As far as setting tension there are instructions on the RBi site or at least there use to be.1 point -
A few years ago I did a parts list comparison for bearing and sleeve numbers via the manuals for each saw. According to the manuals I looked at they're the same thing inside as far as I could tell. I have not had my hands on a Pegas or a "real" Excalibur to take apart and actually compare them side by side. As you may remember I did buy Excalibur guts from Seyco a few years ago and installed them in my China EX-21 version and everything fit fine except the aluminum pieces that fit into the arm tubes at the front of the saw where the rocker arms connect.. The tubing size was smaller for the China saw so I couldn't use the inserts. I was able to take the rocker arm assemblies apart and install them into my china made parts so those were the same otherwise. Be interesting to see if each saw uses the same quality bearings / sleeves.. just because the sizes are listed the same doesn't mean the brand / quality is.. The China saw certainly had cheaper looser bearings in it vrs. the ones that I got from Seyco..1 point
-
My RBI hawk is very good at holding blades. So tension will be the problem your having. Back off on the tension a bit. I break blades in 4 ways. 1) Full speed breaks blades. 2)To much feed pressure will push blade against table and break it. 3)They get hot and break in the middle. 4) too much tension. Yea the blades can be tiny. With tiny teeth / blades feed rate is slow.1 point
-
That worked.. I just made another one and had to resize the pins and the square cutouts had to be resized a bit too as the other day I had to sand them to get them to fit at all.. apparently the 3mm ply they designed this for is slightly different than the 3mm ply I have, LOL.. probably because my ply has been sitting since last year absorbing moisture as the grain is lifted some from what it was when I bought it. Anyway, thanks for pointing out the issue..1 point
-
So bringing this back up and looking for suggestions.. I made these yesterday ( not my design, I purchased a pattern from Etsy ) with my laser. I've actually made quite a few with my laser via several laser designs I purchased from etsy. So far we like this one the best but I have a complaint about the box doors. They swing open which is really neat, however when you swing them wide open the weight of them lifts up the hinge part off the stem and the door falls off if not careful. I've been trying to think of a way to solve the issue but I have no idea so I thought I'd share the photos here and a screenshot of the assembly directions that came with the pattern.. maybe someone here has a idea as I'm at a loss of ideas for the issue. Heck, maybe I'm not assembling it right.. I used no glue whatsoever other than the center part and the two circle pieces on top of the hinge..


 1 point
 -
New Gnome
barb.j.enders reacted to don in brooklin on for a topic
There is a little slide at the top. If all the way to the left the key chain come out at about 3/8 high. I usually have at 100-105 and the key chain is 7/8 high which is the size of the precut wood I use for key chains. I like the idea of the small ones and going to cut a couple that way (Heart and Canada). Thanks for the idea.1 point -

Stone Steel and Steam Engine
wagner1958 reacted to Kris Martinson for a topic
I finished cutting this scroll saw wood-art piece yesterday. From an original painting by artist Ken Zylla.
 1 point
 -
Stone Steel and Steam Engine
wagner1958 reacted to Kris Martinson for a topic
Thank you, but I'm just using the abilities God gave me. He is the amazing One.1 point -
Kudos to Sue Mey Scroll Saw Artist
Mike Crosa reacted to don in brooklin on for a topic
Love Sue's patterns. They are very affordable. Often $5 - $10 and you often get a collection. Just convert currency and no other charges. When you are only making for your own enjoyment it really helps.1 point -

Installing pinless blades is a major PIA. Help
OCtoolguy reacted to zimmerstutzen for a topic
I am mostly a turner, but I scroll small items, mostly Christmas ornaments and carving blanks a few times a year. My used $10 yard sale pinned blade Craftsman until it gave up the ghost last year. but it gave great service for my use and I even cut out some large whales out of 2x8 lumber that are 30 inches long. I have another yard sale scroll saw, a Skill that takes pinned or pinless. Easy to put pinned blades on, .Incredibly ridiculous to get my fumble fingers in there to attach the bottom of the blade. And they break so easy. I also have an old RBI that I finally tried using. it only takes pinless and I can't get a blade to last longer then about 15 seconds. I don't think it is from too much pressure of the stock against the blade, but so difficult to get the pinless blades into the holders straight, so they end up being installed with a slight curve before I am even turning the saw on. I can use a pinned blade for hours with out breaking. What am I doing wrong?0 points


.thumb.jpg.95d348aa76923344a5cab534cc1b3bc1.jpg)


