
Leaderboard

.thumb.jpg.95d348aa76923344a5cab534cc1b3bc1.jpg)


Popular Content
Showing content with the highest reputation on 04/04/2025 in all areas
-

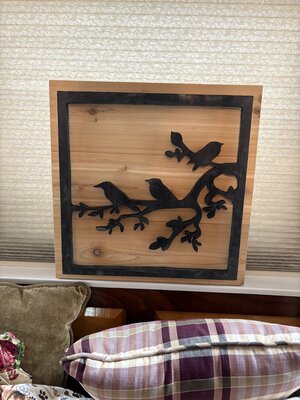
Light scroll project
red river and 2 others reacted to Allen levine for a topic
After our week in the Amish area of pa i saw a lot of pieces of art this one caught my eye because it gives me scroll/fret practice the one I saw was black metal on rough oak I picked up a piece of 3/8 inch ply that was the base top of a pallet that had tiles on it insaw it next to dumpster and the contractor told me take it all but with my back I only took the 4x4 piece of plywood it had some stains but I cut the best piece of it had a lot of shorts from cedar decking I used for my sons outdoor furniture and some bird houses so I used them as a back its raised a bit with 1/2 inch dowels its basically finished but I want to clean up the black painted surface and spray some polyurethane have a look the original is also shown

 3 points
 -
I always check in on the Pattern request folder, even when I'm not requesting any just to see the awesomeness that you and the other pattern designers create! You have made a few patterns for me the last few years and all that you have ever asked for is for us to show the piece when it is finished. I was more than happy to compensate you even though you refused. (Didn't know how confusing it would be to address an envelope to someone in another country! LOL) I am dreading the day that we no longer have our pattern makers for one reason or another. Thank You All.. grampa, Don, Birchtree.. haven't seen for quite a while and others! by the way, can I get a pattern? LOL3 points
-
@kmmcrafts just checked mine, It took a 3/32 allen.2 points
-
Well my grandkids wanted to know if I could make some bangles out of wood for them to sell and make money. I found a pattern on Sue Mey’s site. There were 15 different designs and three siges, sm, med, and lg. I have to say they were not that easy to make. Very slow process. Uses 1 1/2 x 1 1/2 x 4 inch square. Made some out of Walnut, Cherry and Birch, also made two out of Cedar and Butternut which I didn't take a picture of. Used a #7 skip blade


 2 points
 -
Paul, I will have to see how that works when I come over to see you and Patti....2 points
-

2024 Year In Review - Scroll Saw Challenge
ChelCass and one other reacted to bradynjonesjr for a topic
I recently bought a new saw at hf. Both of my work horses went down. One after another. I read all of the reviews about the saw and agree with most all of them. After properly mounting the saw to the table, I checked all of the fasteners, alignment, I replaced the blade thumb screws with the ones from old yellow, loaded up and put her through the paces as close to the limit as possible. Held up wonderfully. Here's her children. Thank you all for your valuable advice. I hope ya'll enjoy them. God bless. 2 weeks worth. 22435CE0AB6CC76688F64BE801BB4FAB84C23353 22435CE0AB6CC76688F64BE801BB4FAB84C23353


 2 points
 -
@JTTHECLOCKMAN It does. Like I said I like simple. The tensioning on the Hawk, just too many clanky things that do not need to be. In my opinion. But I like the saw, not sorry I got it. And will adjust it to my needs. Been using it a lot lately. Got to find a better knob for the upper clamp that does not give me wrist pains to use it. Enjoy the conversation with you.2 points
-

Don't Bother list
danny and one other reacted to JTTHECLOCKMAN for a topic
Yes this is not right for sure. But I can warn you because I see this alot with questions as well not only here but on my pen turning forum. Look at the amount of posts of the person asking and make the decision from there. If they are signed on and have fewer than 10 posts it is a good chance they are just here to use the forum as a resource and not as a friendly place to share ideas and thoughts. Happens alot.2 points -
Still getting used to the Hawk saw I purchased in December. I like simple. One of the things on the Hawk that I kept looking at and could not see why it was done the way it was done is the tensioning. Hegner is so simple, so stable, and straightforward. I love how it works. So after thinking about it, I made a simple modification to the Hawk. I set my tension by the feel and sound of the blade. It is just natural for me. I think the engineer that designed Hawk's really went overboard. Keep in mind this is just me, hundreds of Hawk owners like the way it is designed. I went for the clunky: to simple knob. Reach back a adjust the tension by turning the little knob. Seems to work very well, smooth and simple. Not sure if it will hurt anything, time will tell.

 1 point
 -
After that is adjusted correctly and if you still have issue with the lever at the back popping up.. You may need to replace the wedge shape thing underneath the lever at the back of the saw. That wedge should be pointed and not sharp like to cut you but it should be fairly sharp pointed.. You can just use a piece of fine sandpaper on a flat surface and sand the flat edges to make it sharp.. just be sure to sand both sides of it somewhat evenly..1 point
-
One thing I did notice, my current project has me going thru several blades (1/2" hard maple), When I nip the notch it does change the setting on the blade tension (not much, just a quarter turn it seems) so going forward I'm going to try not nipping the notch and hopefully won't need to change the tension. But I will say, the more I use these Pegas blades, especially on hardwoods, the more I like them.1 point
-
Front tension cam has a set screw to adjust the tension lever on the upper arm. It’s a very small Allen screw directly on the bottom side of the upper arm right below where the tension lever goes into the arm. You adjust the set screw without a blade in you move the front tension lever as if you’re tensioning a blade and adjusted correctly you should feel some resistance about 1/8” - 1/4” before it is fully in the tensioned position. You should also have a small hole in the top or some saws have it on the side of the arm near that lever to place a drop of oil to lubricate the cam so you don’t wear the screw or ensentric out. If you can’t get it to have the resistance then you need to either replace the set screw or the encentric or both. Flip lever over and kinda let it flop over on its own. Should stop before hitting the arm and being all the way n tension position. This shows after I pushed it down the rest of the way. See the hole on top where I oil mine. As said before some have hole on the side instead. This is under the arm where the set screw is.


 1 point
 -
I just finished cutting this today. I am excited because it is the third most difficult cutting I have made in all my scrolling years. It is a @Jim Blume pattern, (thanks Jim), and I copied the way I cut from a person named Elke Sachs Kohon Wiks. If I got that wrong, I apologize. It is not finished, it will have a flat-black backer and Deft semi-gloss lacquer. I cannot finish it in my house, the fumes are really bad for my wife. Have to wait for warmer weather to finish outside. It was a challenge, I used Pegas #1 Skip, Pegas #1 Modified Geometry, 3/0 FD New Spiral, blades. Reason why it is nice to have two scroll saws if you can. I was rolling back and forth between my two saws.
 1 point
 -
Wow, I missed seeing this one....I was out of the area for a bit....I am so glad I got to see it....very wonderful work.1 point
-
@kmmcrafts Kevin, As you may know already I am a rookie when it comes to the scrollsaws in need of repair......So, when you say "I will say if your front tension cam isn't adjusted properly and or worn out that it'll make that lever pop up and not hold the blade correctly" I am unsure what the front tension cam is. I have the Hawk G4 26 could you take a picture of what that looks like. I got my Hawk used so I do not have a manual to look at. My back knob pops up once in a while so was wondering why it is doing that....thank you.1 point
-
That to us is a tow bar/tow ball. We should start a dictionary for each other. What would you say if I said torch??? Marg1 point
-
How time flies. I joined this group ten years ago which was the beginning of my scroll saw journey. So many members here gave me help and guidance. I can't thank you all enough. I have to give @Jim Finn credit for introducing me to inlayed box. That got me going on box building. Now I enjoy Inlaying and also incorporating intarsia into them.


 1 point
 -
Beautiful work!1 point
-
That's another 3 people on my don't Bother list, People ask for patterns then Me and other designers spend our time doing them for nothing then they don't come back on the forum for weeks on end...... rant over1 point
-

Compound Bangles
barb.j.enders reacted to don in brooklin on for a topic
I really think these are cool. The pattern for a few in Issue 61 of Scroll Saw Workshop. I am going to give one a try so I can use as show and tell in the compound cutting course I do.1 point -
They work also well at the Pégas out of the box. No need to nip anything.1 point
-

Pegas MGT 5 question
OCtoolguy reacted to Norm Fengstad for a topic
I never nip the notch off blades work fine on my Seyco1 point -
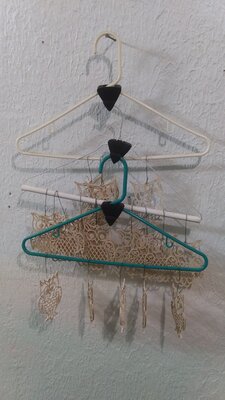
Just sharing a new (that I know of) idea for dealing with lots of ornaments. Plastic coat hangers, with notches cut into the top of the hanger rail. For storage I cut notches ( SS #2 Olsen spiral, if I had them I use a #5 ) every 1/2", for dipping I'll only go 5 ornaments per hanger. For storage I have the hooks of the wire ornament hangers in line with each other, for dipping I have them at right angles. I can get 25 ornaments per hanger for storage. I picked up some "miracle" hanger thingies. With the first package of 18 thingies I can store 525 ornaments easily. Tomorrow I'm going to pick up an inexpensive garment bag and see if I can transport the ornaments across town with it, hopefully without any damage.


 1 point
 -

Sand-O-Flex
danny reacted to Roberta Moreton for a topic
This really surprises me! It looked extremely aggressive! I would be afraid to try it!1 point -
Paul, you have provided many, many, MANY excellent patterns by request for people on this forum. I have tried but in most cases, you post an excellent pattern before I'm hardly started. Also, my patterns tend to be considerably more difficult as that is the style I like to cut. I'm just a novice at making patterns where you are a master. It's a shame so many don't give you the credit due for your hard work. You have helped me with a few pieces and I am deeply grateful.1 point
-
It's been awhile since I've used it last, but I seem to remember using it on puzzles. The nice thing with this sander, it has a single layer of sandpaper that splits into long fingers that get into the tight areas as it spins. A sanding mop has many layers of sandpaper, so while maluable, it covers a larger area. I also seem to remember using it on ornaments that have delicate fretwork and it seemed to work well, especially dealing with the fuzzies.1 point
-
There done like a normal compound cut. Here's a sample pattern. You fold the dotted lines which go around the side of the wood your using and the circle part will be on the flat part of the wood. The only thing different with these patterns is the circle part is four inches which you really can't drill through so what you do is once the pattern is glued on the wood, you cut it in half on the solid line. You now have two separate pieces to work on. Once cut out you glue the two rings back together to get your bangle. Then sand it. Hope that helps.
 1 point
 -
Many scollers asked me to make layered american truck pattern, finally I made it. Project size 9,5 x 7 inches, stand is optional, recommended to use wood stain or 2 types of wood American truck pattern Video of making project


 1 point
 -
Thanks for your kind words Marg. I'm sure if I'm upright and my hands aren't too shaky I will be in my shop.1 point
-
I do not, but I use do use a sanding mop similar to what Scrappile posted. However, I make my own. Much less expensive and very easy to make.
 1 point
 -
I hang mine from the edge of a wire shelf or off the fence rail on my Shopsmith. I use copper wire for the hanger, which I cut from a piece of heavy grounding strap. .
 1 point
 -
That's a interesting idea... look forward to hearing how the transport goes.1 point
-
So bringing this back up and looking for suggestions.. I made these yesterday ( not my design, I purchased a pattern from Etsy ) with my laser. I've actually made quite a few with my laser via several laser designs I purchased from etsy. So far we like this one the best but I have a complaint about the box doors. They swing open which is really neat, however when you swing them wide open the weight of them lifts up the hinge part off the stem and the door falls off if not careful. I've been trying to think of a way to solve the issue but I have no idea so I thought I'd share the photos here and a screenshot of the assembly directions that came with the pattern.. maybe someone here has a idea as I'm at a loss of ideas for the issue. Heck, maybe I'm not assembling it right.. I used no glue whatsoever other than the center part and the two circle pieces on top of the hinge..


 1 point
 -
Me too, at 80 it's hard to learn new stuff. A few years back I got CNC machine, bought a special table for it, set up a water cooling system, paid a young CNC guy to spend a day with me to show me how to use it. And a week later sent it back at a shipping cost of $100. And that was 5-6 years ago....now AI! No wayLOL1 point
-
AI is just new. I do not even have a cell phone yet. Nothing against "New". I just would rather talk to people. So @JTTHECLOCKMAN, I say state your opinion. It will not offend me. I do not know if I love or hate AI. I have not been involved with it. Probably never will. At 81, I do not think I could figure it out, just like a cell phone. I do think with Gimp, and Inkscape, other available software; Pattern making is way more difficult than it should be. But just because I can't do it does not mean I hate it or it is bad. Just means it is all way over my abilities. I have been around computers most of my life. My main job when I got out of the service was as a computer operator, way back when Computers took up rooms. They were in climate-controlled rooms, cooled by liquids and took crews to operate them. So look what has happened in my lifetime. Now, a cell phone has more computing power than those old computers. Pictures back in my day: Yes, you had to wear a coat and tie to operate a computer, even on graveshit!

 1 point
 -

2024 Year In Review - Scroll Saw Challenge
Scrappile reacted to heppnerguy for a topic
I am going to have to give at least one of these dogs a try and I want to add that I love the color combination of the restaurant sign. All are fabulous. Dick heppnerguy1 point -
Love it! Here’s the scene above my reading chair.
 1 point
 -
Thank you, but HA! You have the skills to cut that on one of your little pieces of 4" x 5" Oak! The backer, 11" x 14". My. wife was at a quilting bee for a couple of days, so I did get it mounted on a backer. Still, need a frame and finish.
 1 point
 -
Not my best, most difficult

 1 point
 -
Hmm, well that's just dumb.. now when you break a blade there is no lever at the back that pops up out of place that makes you get up off the chair so you can reach back and pop it back over into place. Great idea really.. as far as I know the lever action one has always been the design they have used and you're right.. it's over engineered and no reason i can see as to why it's like that.. other than years ago that's how they described how to tension the blade properly.. which was always way off from what they say on the sticker anyway.. at least for me on my saws.. IF you haven't maybe you should post that on the FB Hawk Group.. maybe Bushton will get the hint that we don't like that lever popping up out of place when a blade breaks.. BTW, I looked at a Hawk for sale once where they just threaded a nut on that rod.. I just assumed they lost the actual lever and too cheap to replace it.. now making me wonder if maybe someone did that on purpose I will say if your front tension cam isn't adjusted properly and or worn out that it'll make that lever pop up and not hold the blade correctly.. not sure if the knob would keep it on tension better or not..That's usually how I learn that I need to adjust that little set screw underneath the upper arm at the front of the saw..1 point
-
Ring Box?
danny reacted to JTTHECLOCKMAN for a topic
What I have done in the past was take some felt of color you want to use. Cut it to basic size to fit box but make it long. Now roll it up from both sides till they meet in the middle. Now you can trim some more to fit in the box with scissors. The fold is where the ring goes. Now you would want to adhere it to bottom of the box so it does not get pulled out. The toughest part I found was the shape of the box was a heart shape. So trimming was a little trickier. That was the basic way I did ring boxes because they were smaller. Now I have done other boxes using different methods too. I use foam under the felt and cut the foam and then wrap with felt making sure to form the felt into the crevices. Some boxes I just left it like a pillow in there. I do not have photos of ring boxes but maybe a photo or 2 of the other type boxes. Probably not because again I was not taking photos with a digital camera back then. Now some photos I converted but will see if I did any of those. I know I have one of the pool table pen box I did. Maybe the idea can be used for your situation and do not know why not. Sorry the photos are not that good in showing things and I could not find the one with the pool table and no pen in it but you get the idea. Just carve the foam and cover with felt. The same with the trinket boxes. I also did some religious cross boxes that I used same idea with felt but again those photos are on film only. I keep saying one day I will transfer alot of those but it would take some time. The roll of the felt was used on smaller ring boxes.

 1 point


