
Leaderboard


Popular Content
Showing content with the highest reputation on 04/05/2025 in all areas
-

Book Marks
Jim McDonald and 5 others reacted to Wichman for a topic
Just finished cutting these. I probably won't put any finish on them, the side cuts just don't have enough of a kerf to prevent the finish from glueing them shut. The patterns are from Wildwood designs. The designer is not listed on the pattern. 1/16" Basswood, FD Polar #2/0 blades for all cuts. I couldn't remember what direction the grain should run, so the first two I cut were 90° to each other and one snapped as soon as I got it off the saw. I cut the rest with the grain running lengthwise. I kept all the fallout that was recognizeable.
 6 points
 -
This a modified Charlie @Charlie E rendition. Thank you Charlie! I changed the pattern he sent me because I wanted an Irish look (since they love Ireland) I had to actually cut and paste the letters and used white-out to make the pattern I wanted, plus she likes plants/trees so I added some leaves. Attached is the pattern Charlie made me as well as my final work. I also decided to do some hand carving since I wanted a bit more depth. I used green satin fabric in epoxy for the background over a thin sheet of Paruvian walnut.

 5 points
 -
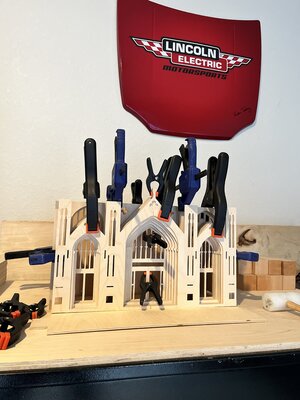
I've got five of these cut and only one is really useable. It's okay as this was a test of my limits and the materials limitations. All the tails broke at 11" (out of 14") , so I think that's the limit, for now. Many of the smaller details broke, so I'll limit myself to closed edge patterns for now. I still like the concept, now to adjust some patterns
 5 points
 -
On The Bench - Scroll Saw Challenge
JackJones and 2 others reacted to SCROLLERNATION for a topic
1 small piece at a time.
 3 points
 -

2024 Year In Review - Scroll Saw Challenge
ChelCass and 2 others reacted to bradynjonesjr for a topic
I recently bought a new saw at hf. Both of my work horses went down. One after another. I read all of the reviews about the saw and agree with most all of them. After properly mounting the saw to the table, I checked all of the fasteners, alignment, I replaced the blade thumb screws with the ones from old yellow, loaded up and put her through the paces as close to the limit as possible. Held up wonderfully. Here's her children. Thank you all for your valuable advice. I hope ya'll enjoy them. God bless. 2 weeks worth. 22435CE0AB6CC76688F64BE801BB4FAB84C23353 22435CE0AB6CC76688F64BE801BB4FAB84C23353


 3 points
 -
Thought i would try something new. This is a Sheila Landry Pattern. It's around an 8 x 10 and made out of Walnut. P.S. I don;t smoke weed. LOL! !
 2 points
 -
"Vamp" 36,5cm x 45,5 cm, backer board 4mm, Vamp 4mm, 'cheap' DIY store ply, done with a hand held fretsaw with a #1 blade.
 2 points
 -
This topic is quite enlightening....thanks everyone, gives me a better understanding of my Hawk2 points
-
Front tension cam has a set screw to adjust the tension lever on the upper arm. It’s a very small Allen screw directly on the bottom side of the upper arm right below where the tension lever goes into the arm. You adjust the set screw without a blade in you move the front tension lever as if you’re tensioning a blade and adjusted correctly you should feel some resistance about 1/8” - 1/4” before it is fully in the tensioned position. You should also have a small hole in the top or some saws have it on the side of the arm near that lever to place a drop of oil to lubricate the cam so you don’t wear the screw or ensentric out. If you can’t get it to have the resistance then you need to either replace the set screw or the encentric or both. Flip lever over and kinda let it flop over on its own. Should stop before hitting the arm and being all the way n tension position. This shows after I pushed it down the rest of the way. See the hole on top where I oil mine. As said before some have hole on the side instead. This is under the arm where the set screw is.


 2 points
 -

On The Bench - Scroll Saw Challenge
ChelCass and one other reacted to Roberta Moreton for a topic
This one that’s been “On the bench” for a couple of years is finally finished! Steve Good design. IMG_2406.mov 2 points
 -
Still getting used to the Hawk saw I purchased in December. I like simple. One of the things on the Hawk that I kept looking at and could not see why it was done the way it was done is the tensioning. Hegner is so simple, so stable, and straightforward. I love how it works. So after thinking about it, I made a simple modification to the Hawk. I set my tension by the feel and sound of the blade. It is just natural for me. I think the engineer that designed Hawk's really went overboard. Keep in mind this is just me, hundreds of Hawk owners like the way it is designed. I went for the clunky: to simple knob. Reach back a adjust the tension by turning the little knob. Seems to work very well, smooth and simple. Not sure if it will hurt anything, time will tell.

 1 point
 -

Angel fish (Steve good free download)
red river reacted to Allen levine for a topic
Practicing my unsteady hands used a 2/0 fd blade for 1/4 inch and broke or bent 3 blades i used a 9 blade for 1/2 inch pieces base and stem all pieces again came out of bins i know the pattern uses the same species for stem since it's part of tail but I used what looks like white oak or ash and sapele scraps for fish inhave a boatload of poplar from all the other projects so made the grass with that took me approx 3 hours to cut and sand Used some old stain and I routed a small curve around base im still struggling with tight turns even with 2/0 blade i ended up using a 3 blade to finish the 1/4 inch pieces much easier for me
 1 point
 -
Light scroll project
red river reacted to Allen levine for a topic
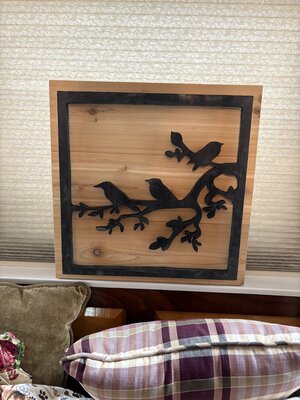
After our week in the Amish area of pa i saw a lot of pieces of art this one caught my eye because it gives me scroll/fret practice the one I saw was black metal on rough oak I picked up a piece of 3/8 inch ply that was the base top of a pallet that had tiles on it insaw it next to dumpster and the contractor told me take it all but with my back I only took the 4x4 piece of plywood it had some stains but I cut the best piece of it had a lot of shorts from cedar decking I used for my sons outdoor furniture and some bird houses so I used them as a back its raised a bit with 1/2 inch dowels its basically finished but I want to clean up the black painted surface and spray some polyurethane have a look the original is also shown

 1 point
 -
Only drawback is, in Alabama, its legally probable cause to search my truck.

 1 point
 -
Paul got it right. Just a little joke about Willie and marijuana.1 point
-

New Gnome
red river reacted to don in brooklin on for a topic
For all you Gnome-holics out there. This is a little different in that it has arms compound cut. I modified one of Diana Thompsons patterns of a Dragon. Also, the person who requested this wanted 2 signs so the sign is held on by earth magnets and can be changed easily. PS: Please no political comments as I have enough of those on Facebook to sink a ship.
 1 point
 -
Ralph, excellent job, RJ1 point
-

Second project
heppnerguy reacted to Phdesigns for a topic
A bit easier, maybe, than my first (tree of life). Doing this for a niece’s wedding. Still need to finish the date. The initials and the date came from enlarging their announcement. Found the rings pic and traced it and made it scrollable. Doing this with #5 skip tooth blade. Drilled #58 (.043) holes. Cut on the Bauer 22” saw. A bit tight but working well so far. Thanks for looking. Comments, advice always welcome. 1 point
 -
A torch is a flashlight, Australian is about the only foreign language I can speak some of and understand most.1 point
-

Willie nice receiver hitch cover
Charlie E reacted to heppnerguy for a topic
I don't understand when you say it is illegal in Alabama. What part of this is illegal and why? I think it is a very cute little addition and probably brings a lot of smiles to the people that might be following you on the road. Dick heppnerguy1 point -
I like those. May have to try some for fun. I read and am always looking for my book mark. They disappear in my sheets and I don't find them until I change sheets!1 point
-
Spiral dragons
Wichman reacted to heppnerguy for a topic
It does indeed to appear quite changing to be cutting the long part without it breaking. No one really would know it was supposed to be longer if they were not told that anyway. I think you did a marvelous job on them Dick heppnerguy1 point -
There are neat, RJ1 point
-
Nice, RJ1 point
-
Physical Therapist Pattern
Juan Rodriguez reacted to don in brooklin on for a topic
Sue Mey has a pattern at https://scrollsawartist.com/proud-to-be-a-physical-therapist-physiotherapist/?searchid=377804 It says "proud to be" which could be changed or removed.1 point -
Physical Therapist Pattern
Juan Rodriguez reacted to Wichman for a topic
Also there's a large wall hanging pattern on Steve Good's site; search for "physical" in the pattern section1 point -

Physical Therapist Pattern
Juan Rodriguez reacted to kmmcrafts for a topic
I have a Christmas ornament pattern I had someone make for me several years ago.. If a ornament works.. Sorry for posting a link to the ornament.. I tried to right click save it to upload here but it won't work so I'll just post the link to the item. https://www.kevskrafts.com/listing/485054599/physical-therapist-or-assistant Probably could enlarge it and make a backer if you wanted to make a wall hanging piece out of it.. send me a PM and I'll share the pattern if it'll work for what you have in mind.1 point -
After that is adjusted correctly and if you still have issue with the lever at the back popping up.. You may need to replace the wedge shape thing underneath the lever at the back of the saw. That wedge should be pointed and not sharp like to cut you but it should be fairly sharp pointed.. You can just use a piece of fine sandpaper on a flat surface and sand the flat edges to make it sharp.. just be sure to sand both sides of it somewhat evenly..1 point
-
Wow, Kevin, thanks so much....I will need to read this a couple of times through just to get all that you said....I think I get it....thanks again!1 point
-
@kmmcrafts just checked mine, It took a 3/32 allen.1 point
-
One thing I did notice, my current project has me going thru several blades (1/2" hard maple), When I nip the notch it does change the setting on the blade tension (not much, just a quarter turn it seems) so going forward I'm going to try not nipping the notch and hopefully won't need to change the tension. But I will say, the more I use these Pegas blades, especially on hardwoods, the more I like them.1 point
-
Compound Bangles
barb.j.enders reacted to Wichman for a topic
Who is checking? You are, or at least your conscience. Hopefully.1 point -

Four more Miniature Birdhouse Ornaments
heppnerguy reacted to Denny Knappen for a topic
Four more Miniature Birdhouse Ornaments designed by the late Diana Thompson. I used Walnut for the birdhouses and Spectraply for the little birds. Cut on the Pegas Scroll Saw using Pegas #3 Super Skip blades for the little birder and Pegas #6 Super Skip blades for the birdhouses. After a light sanding with a Mac Mop, dipped in diluted Shellac, another light sanding, and a final dip. Comments welcome.


 1 point
 -
Second project
heppnerguy reacted to Phdesigns for a topic
Done. Be a late gift, but….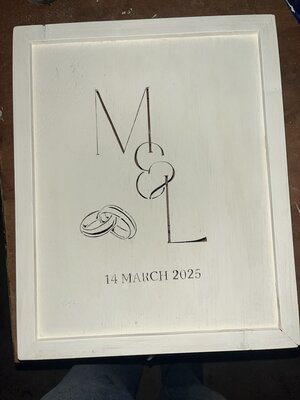
 1 point
 -
.thumb.jpg.95d348aa76923344a5cab534cc1b3bc1.jpg)
New Gnome
heppnerguy reacted to barb.j.enders for a topic
Looks great @don in brooklin on. This was my take on Elbows Up. I did take two and turn them into earrings that I wear when I go out. 1 point
 -

On The Bench - Scroll Saw Challenge
Mike Crosa reacted to Xcrewchief for a topic
This is beautiful!1 point -
On The Bench - Scroll Saw Challenge
Mike Crosa reacted to Xcrewchief for a topic
Hello folks! I’m new to the group and pretty much a rookie scroller. this is the project I just finished working on because I got an email from a friend of mine with my favorite woodworking question: can you make this? I don’t have the skill (or saws) you talented folks have, but I do what I can. (I didn’t do the actual skull or antlers)


 1 point
 -

On The Bench - Scroll Saw Challenge
ChelCass reacted to Kris Martinson for a topic
Well done!1 point -
Here is a Cardinal - I know it is a popular Intarsia subject - I made from a 39-piece pattern I adapted from an image of a SG piece. The Cardinal and Flowers is approximately 8 ½” x 8 ½”, surface mounted on a 9 ½” diameter solid wood plaque style backer. Wood used: Aspen, Bloodwood, Poplar, Wenge, Mahogany, Yellowheart, and Sycamore for the plaque backer. The eye is a dot of white paint. The assembly is protected by multiple coats of rattle can spray Clear Gloss Acrylic Finish. The following JFYI. I happen to be fortunate to find a couple of Poplar nom 1"x8"x8' boards at my local Lowes that had a lot of, the hard to find, dark green color heartwood. I purchased them and added them to my wood stock, so I did not need to enhance the leaf color with dye or paint. I attempted to add some sculpturing effect to the flowers and it resulted in some visable color variations after applying the finish that I had not planned on, but my Lady says looks good. She says they look like real Dogwood Flowers. The Bloodwood, like Padauk, makes very fine dust that sticks to and stains other wood, however, it is not quite as deep dark as Padauk and it has slightly more color variations that was needed for this piece. The photo makes the red look darker then is is in real life. Comments and critiques are always welcome. This will be my last new project post for about 8 weeks. Please check out my post in Coffee House. EDIT: Pattern posted in Pattern Exchange
 1 point
 -
On The Bench - Scroll Saw Challenge
bradynjonesjr reacted to barb.j.enders for a topic
Got these done on Thursday. Pattern help from @don in brooklin on and @Fab4. Cut from leftover Cedar rail material. Finish is Walrus Oil. 1 point
 -
On The Bench - Scroll Saw Challenge
bradynjonesjr reacted to Wichman for a topic
Finished cutting, now on to painting and staining. I'll put this on the back burner untill the weather warms up a bit more.
 1 point
 -
To me this is one of Steve's best pattern ever. Everyone seems to like it. I cut if out of 3/4" Red Oak.


 1 point
 -
Not Totally Finished, But Have to Wait for Spring
heppnerguy reacted to Wichman for a topic
Very nice cutting. Here's my setup for blades for the Hegner. When I found that I needed the small blade holder, I ordered an extra set of standard holders, 2 sets of small, and 1 set of larger holders. Since I use the quick clamp, this let's me have 4 small blades, 4 medium, and 2 large ready to go. And any mix of those sizes. I have a small dry erase board with the sizes written on it for organizing the blades. This makes quick work of changing blades when they dull or changing types when necessary. 1 point
 -
Here is the Lab pattern. Making it a Chocolate lab shouldn't be any problem. Just stain or paint your backer brown. Glad you like it and I hope your piece turns out as nice as mine did.1 point
-

Which Scroll Saw Blades Should I Buy?
JimB29532 reacted to Bill WIlson for an article
I think a couple issues that new scrollers have, especially if they have some familiarity with other wood cutting saws, is how slowly scroll saw blades cut and how quickly they wear out. Size & type will determine how fast and how long a scroll saw blade will cut but they will never cut like a bandsaw, table saw or even a jig saw blade. Setting realistic expectations seems to be one of the first things a new scroller needs to understand.1 point -

Spring - Scroll Saw Challenge
JimB29532 reacted to joel brinker for a topic
This is a Sue Mey pattern a bought awhile ago, several people like it before so i stack cut 4 more, painted with mica powder, then put alcohol ink colored epoxy resin in the cuts I made


 1 point
 -
Spring - Scroll Saw Challenge
JimB29532 reacted to barb.j.enders for a topic
This is my latest Intarsia piece. Pattern found in the issue # 54 of Scrollsaw Woodworking & Crafts magazine, designer Gary MacKay. Woods used Tigerwood, Maple, Canarywood, Quilted Maple, Sapelle. One generous coat of shellac. Used many #5 MG blades. 1 point
 -
 Saw's Bevel Gauge Most saws have a basic bevel gauge built in. Often times this is below the saw along the rocker. A simple needle points to the gauge marked on the rocker to indicate the angle. My scroll saw has a gauge built into the table, which makes it easy to see. This is a good way to get in the general ballpark, but not very accurate nor repeatable. Use this gauge if you don't need repeatable angles, or if accurate angle isn't necessary. Protractor A simple protractor is an easy way to get an accurate reading. You can pick one up for a couple of dollars at an office supply store. Make sure you buy a small enough one where you can lay the protractor against the blade. Line up the bottom of the protractor to the center mark, then adjust your table to the appropriate angle. Paper Protractor I like using a paper protractor. Download this paper template here. Use spray adhesive to attach it to some 1/4" plywood, then cut it out with your scroll saw. The nice thing about paper protractors is you can write on them. Use a red pen and draw a straight line from center point to the appropriate angle. Then simply adjust the table and line up the red line with your blade. You can also write notes on the protractor for each project (IE Bowl. 20 degrees for 3/4" stock.) Digital Angle Gauge I use a digital angle gauge. I picked mine up for about $30 on Amazon. This is super accurate, getting within 1/10th of a degree. You turn it on, place it on the bed of your scroll saw, then push the "Zero" button to zero out the gauge. Then you can start tilting your saw until you get your exact angle. This is my favorite method. I also love being able to use the gauge on other tools where I need an accurate angle. The magnetic bottom will attach to a table saw blade as you tilt the blade. Smart Phone Phones now days are amazing. They even have a built in angle gauge. I usually have mine within easy reach and it's very convenient. I use the iPhone, and the gauge is listed under the "compass" app, which is pre-loaded on your phone. Swipe to the left to get off the compass and onto the angle gauge (level). Place the phone on it's edge, then tilt your bed. Be careful to keep a hold of your phone. You don't want it to slide off onto the concrete floor (I won't tell you how I know this). This is super convenient. The only draw backs is your table has to be level with the floor to begin with (no zeroing option) and it only measures to the degree, not a fraction of a degree. I'm sure there are other free apps that address these issues, but the built in app works well enough. TCF002_Protractors.pdf1 point
 -

Setting Table Tilt On Your Scroll Saw
JimB29532 reacted to Phantom Scroller for an article
I like the smartphone one Travis. Roly1 point -
Book Marks
Wichman reacted to heppnerguy for a topic
I wonder how durable they will be in use, as the thickness is so thin. What wood did you use for them? Dick heppnerguy0 points


.thumb.jpg.95d348aa76923344a5cab534cc1b3bc1.jpg)


